Abstract
This report presents the past four years of our adaptation and implementation of the construction program PlanGrid as a digital field registration system at the Tel Burna Archaeological Project (Israel). In this report, we will discuss the following: (1) the benefits of using PlanGrid with tablets and smartphones; (2) details related to our specific adaptation at Tel Burna; (3) this past season’s innovation of replacing traditional architectural top plans with photographs taken with a camera attached to an overhead apparatus; and (4) instructions on how other projects may implement PlanGrid as a digital archaeological tool.
Introduction
In recent years, many archaeological projects have adapted their field registration methods to incorporate new technological innovations in order to improve the accuracy, efficiency, and publication of their projects. With the advent of cheaper and reliable forms of hardware (e.g., iPads, Window Surface, etc.), these tools have increasingly been implemented for various purposes in both the field and laboratory (see discussion in McKinny and Shai, in press). At the same time, many new digital programs and applications have been developed to handle the considerable data-management, field-registration, and digitization needs of an archaeological project (REVEAL – Gay et al., 2010; e.g., Codifi – Prins et al., 2014; Archfield – Smith and Levy, 2014).
Over the last few seasons, the Tel Burna Archaeological Project has taken part in this discipline-wide endeavor through our adaptation of PlanGrid as a replacement for our hand-written paper forms and plans. PlanGrid is a widely-used construction app that has revolutionized the construction industry by creating a cloud-based, intuitive blueprint and project management tool (e.g., Miller, 2015). Significantly, many of the main features that allow PlanGrid to streamline workflow within a construction project have a parallel application for an archaeological excavation. These include the following: architectural plan management; searchable and adaptable annotations; archived field photos that can be linked to specific data; scaled field measurements; well-defined and useable administrator tools; simple report compilations in both CSV and annotated PDF formats; and reliable cloud storage across multiple devices with or without an internet connection. Below, we will discuss each of these benefits within the context of our adaptation of PlanGrid at Tel Burna.
The benefits of using PlanGrid with tablets and smartphones
Laptops, tablets, and even smartphones are becoming more and more commonplace at archaeological excavations all over the world. In particular, tablets such as the more recent generations of iPad or the Windows Surface give archaeologists a tool that provides an adequately sized screen, long battery life, a built-in camera, durability, and affordability. PlanGrid is designed to provide its highest level of functionality with a tablet or smartphone and was initially only available on an iPad.
PlanGrid on an iPad works exceptionally well. This is clearly due to the fact that the program has passed the test of being a useable paperless alternative in the construction industry. Since PlanGrid is an app designed around a for-profit cloud-based service, users are assured of both program stability and constant improvement and development. As archaeologists who are concerned with preserving cultural heritage through digital means, PlanGrid’s popularity in the construction industry ensures us that the program will be around for many years to come. In addition to PlanGrid’s stability, it is also inexpensive. This is a major benefit since archaeological projects are often underfunded. Regarding cost, PlanGrid’s free 50 sheet cloud fits the needs of our project, but they also offer several inexpensive options that include storage for many more sheets. The combination of a stable, constantly improving cloud-based program at no cost made PlanGrid an attractive option as a field registration tool at Tel Burna.
In light of this, we chose the combination of an iPad as our field registration tool at Tel Burna. While any later generation iPad will work with PlanGrid, we recommend purchasing iPads with cellular capabilities even if the project does not plan on purchasing a data plan for the device. The cellular feature has two main advantages. First, a project may later decide that they need internet access. Second, the cellular capability comes with a high level GPS chip that makes all photos taken on the device geo-referenced.
During a typical excavation season, we will work in at least three areas, which means that we need at least one device for each area supervisor. Briefly defined, our adaptation of PlanGrid involves uploading a separate architectural top plan for each day of excavation and annotating that plan with our own built-in Locus/Wall and Basket forms on an iPad. Since we do not have internet accessibility at our site, area supervisors register their particular area with PlanGrid on their iPad throughout the day. Upon returning to the excavation camp, each supervisor syncs their data to the cloud, downloads the available data from the other areas, and repeats the process for the next day of excavation.
The benefits of replacing hand-drawn top plans with “aerial” photos and PlanGrid
Over the past two seasons, we have added an additional layer to our recording system as we have replaced daily hand-drawn top plans with “aerial” photos of each excavation square. While aerial or drone images are very common in archaeological excavations, it is very difficult if not impossible to remove and replace shade over an excavation area (a necessity in July in the southern part of Israel) in order for a drone to fly over and take aerial images. Our solution to this problem was to take “aerial” photos beneath the shade using an apparatus that allowed us to take photos with enough elevation to capture all four corners of our 4 x 4 meter excavations. These photos are achieved simply by attaching a DSLR camera with a wide angled lens to a 5.5-meter-long pole (via a GorillaPod flexible tripod and some well-placed tape), which is then raised above the excavation square to take a straight-down photograph. After each square has been photographed, these photos are simply placed within the excavation square in Photoshop and the entire plan is uploaded (as a PDF) to PlanGrid. This process is repeated each day of excavation.
The Tel Burna Archaeological Project
The site of Tel Burna is located in the Judean foothills (Shephelah) a geographical region between the southern Coastal Plain in the west and the Highlands toward the east. A wide range of evidence, including Egyptian, Assyrian and Babylonian texts; biblical passages; epigraphic and material cultural finds, attest to the importance of this region as a borderland in the Bronze and, particularly, in the Iron Age, when Judahites and Philistines settled on opposite sides of the border. Since 2009, Tel Burna has undergone eight seasons of archaeological investigation under the direction of Itzhaq Shai of Ariel University. The first five seasons of excavations were under the academic affiliation of the Institute of Archaeology of Bar Ilan University, but the last two years, the excavation has been affiliated with the Institute of Archaeology of Ariel University.
Surveys at Tel Burna have shown that the site was inhabited from the Early Bronze until the Byzantine period, but occupation on the tell’s summit ceased during the Persian Period. According to the surveys and the preliminary results of the excavation, the Late Bronze Age and Iron Age II are the most significant periods of occupation at Tel Burna (Shai and Uziel, 2014; Uziel and Shai, 2010). Thus far, we have opened five areas and revealed occupational levels ranging from the 13th-5th centuries BCE. In Areas A1 and B2, we have revealed segments of a large casemate fortification that was in use during the Iron II that seems to be related to the border fortifications of the Kingdom of Judah, i.e. the Iron Age II (Shai et al., 2012). In Area A2, our team has uncovered a large 8th century BCE building on the summit with finds from the 9th-early 6th centuries BCE (Shai et al., 2014, 2015a). In Area C, we exposed several agricultural installations that seem to date from the Early Bronze Age until the Iron Age II. In Area B1, we are excavating a 13th century BCE public building with many imported and cultic finds (Shai et al., 2015b). For the purposes of this paper, we will use Area B1 as a test case for illustrating our adaptation of PlanGrid for use as an archaeological field registration tool.
Area B1 – a large cultic building from the Late Bronze Age
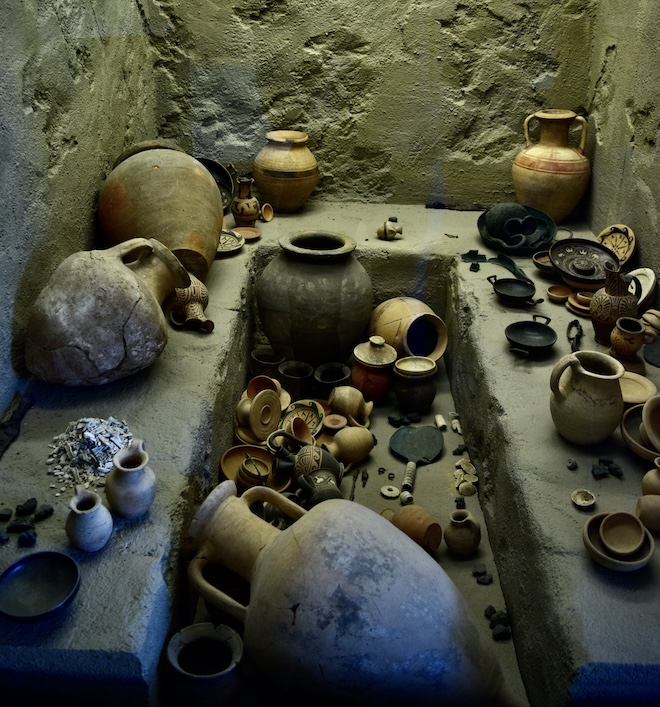
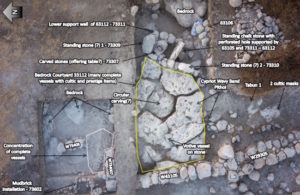
Excavations in Area B1 have uncovered parts of a large building (Building 29305). The architectural remains were found only a few centimeters below the surface. The plan of the structure exposed thus far indicates that it had a large courtyard, constructed directly on the bedrock. The western side of Building 29305 is defined by a 1.4 m wide wall that runs southeast–northwest for a length of 15 m. Near the western wall on courtyard 33211, we found many different locally made and foreign objects. Among these finds were two ceramic cultic masks, several goblets or chalices, a unique three-cupped Cypriot votive vessel, a glyptic cylinder seal in the Mittani style, an Egyptian scarab, two Cypriot wavy-band pithoi, alongside many other finds (Shai et al., 2015b; Sharp et al., 2015). (See Fig 1)
_____________________________________
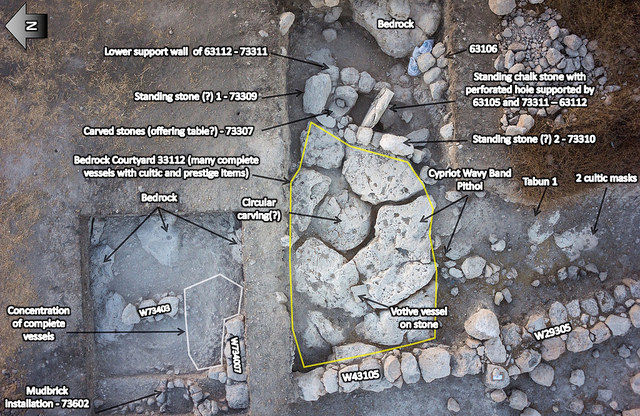
Fig 1
____________________________________
We will now use this general archaeological context from Area B1 at Tel Burna to illustrate our adaptation of PlanGrid as a field registration tool:
A guide to adapt PlanGrid as a field registration tool using Area B1 as a test case
This section provides a step-by-step guide on how to setup PlanGrid on an archaeological project by using screenshots of fieldwork in Area B1 at Tel Burna as a case study.
1. Sign up for a PlanGrid account at http://www.plangrid.com/en.
2. Choose a pricing option at https://app.plangrid.com/en/pricing. You will need to decide if you would like to have a separate PlanGrid account for each season, which means using PlanGrid would be free if your project’s needs are below the 50-sheet threshold, or if you would like to store all your sheets and annotations for your entire project. For the first option, you will need to set up a separate email account and profile credentials for each season.
3. Start a “new project.” Start a new project and name it after the specific archaeological area within the project (e.g., 2016 Tel Burna Area B1). At Tel Burna, each of our devices is signed into the same account, however, a hierarchal workflow (i.e., view-only, administrator credentials) is available if this is necessary for a given project.
4. Customize your project’s stamp/issue list to fit your field registration system. This is accomplished by selecting the punching glove on the tool bar, then selecting “customize stamps.” These issue buttons will serve as the tagged basket and locus forms (or other variations from other recording systems). In theory, the issue list should be customized to match your existing registration system (e.g., “L” represents locus). Note: this step only has to be completed in the initial setup for the excavation season and the customized stamp/issue list can be shared with each “project” (i.e., each excavation area) as long as it remains under the same PlanGrid profile.
5. Create your top plan. This step will largely depend on your project’s method of creating a top plan. At Tel Burna, we overlay an “aerial” photograph (extended over the excavation square – see above for description) over our architect’s hand-drawn plans. Once we have taken these photos of each square, we add it to the top plan in Photoshop and then export the slide as a PDF. This process is then repeated each day. It is helpful if your top plans remain the same size, so that relevant annotations may be copied from one day of excavation to the next.
_______________________________________
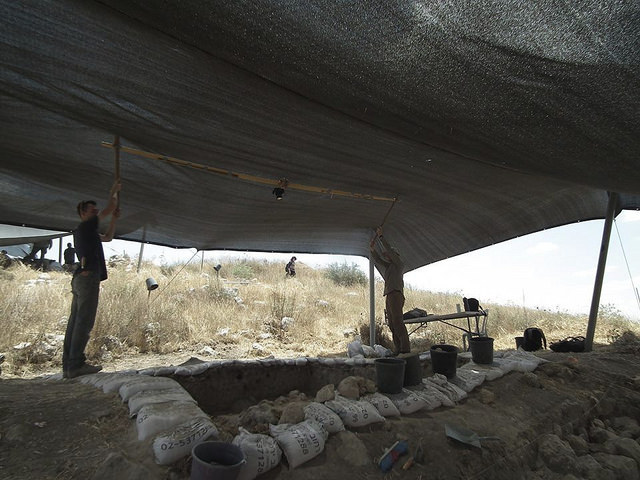
Fig 2
_________________________________________
6. Upload your PDF drawing top plan of the excavation area to PlanGrid. This PDF top plan counts as one sheet against your 50-sheet free account. For this step, you will want to include the excavation date, area, and project so that the drawing is displayed properly in the dashboard and may be easily located in a search, although the sheet names can be edited in the browser version of PlanGrid. Note: steps 5-12 are repeated for each day of excavation.
7. Create template stamps for your basket, locus and other field registration forms. This process involves selecting the appropriate stamp (e.g., “L” for Locus) and adding a pre-defined list of data fields from your existing registration system (e.g., stratigraphy, matrix, stratum, etc.) to the “description” stamp template. To make stamps easily distinguishable, users may want to select a specific color for the stamp template (e.g., baskets are black, loci are red, and walls are green). This is accomplished by choosing a color from the tool bar either before creating the template or simply changing the color while the button or text has been selected. These template stamps should be placed in a location on the top plan where they can be easily copied throughout the day as new loci and baskets are opened.
_______________________________________
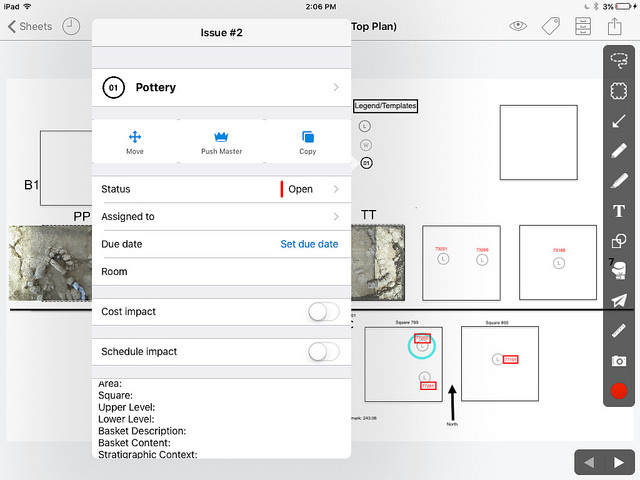
Fig 3
_______________________________________
8. Register your area by annotating your plan with your pre-defined stamps. This step is the main work of PlanGrid and requires a more detailed explanation. Users should copy and paste their template stamps as the need arises. These stamps should be placed where either the defined archaeological feature (locus/wall) or find (basket/bucket) was excavated. In order to accomplish this, it is helpful to zoom in to the exact area on the top plan before adding your annotation. The resolution of the annotation (i.e., the zoom level) is preserved when viewing the plan on a tablet or smartphone and is helpful for illustrating the archaeological features of an excavation square. Once the annotation has been added and while still at the appropriate zoom level, it is advisable to add a graphic representation of the stamp. If you are using a color-coded system you will want to match the color of the graphic with the stamp (e.g., in our system – a locus number and stamp will both be in red). In addition, there are several font sizes to choose from that may also help distinguish different types of data/stamps. At Tel Burna, we use the following annotation system: blue with the smallest font size to represent levels (no stamp needed), black with the smallest font size for baskets, red with the second smallest font size for loci (or pink if we want to distinguish different types of locus features), and green with the second smallest font size for walls. Once the stamp has received a graphic title and been properly sized and colored, it is ready for data entry, which is accomplished by clicking/touching the stamp and filling in the appropriate details.
_____________________________________
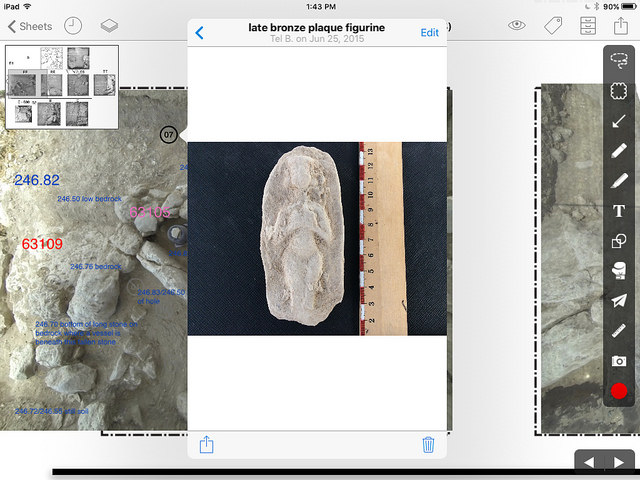
Fig 4
________________________________________
9. Fill in a form within a pre-defined stamp. Upon opening the form, users should do the following: (1) rename the stamp to the name of the locus or basket number; (2) write the name of the locus (for baskets) or square (for loci) under the data field title “room”; (3) fill in all of the appropriate details in the description section of the form, which will be populated by data field titles from your template; and (4) add a photo or photos of the locus and basket. Within the form, you also have the option to change your stamp symbol, move, copy or add a comment to your annotation. In order for photos to be attached to a specific stamp, the photos must be taken by selecting “add photo” at the bottom of the form. The “camera” button on the tool bar does not link the photos to stamps. The data within these stamps forms (including the photos) will be used to create the annotated PDF and CSV reports. Please note that there are several features in this section that we have not used in our adaption (e.g., push master, assigned to, and layers).
________________________________________
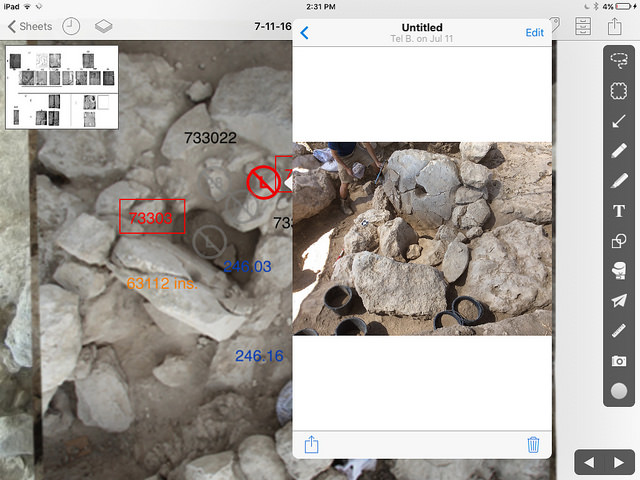
Fig 5
________________________________________
10. Measure within PlanGrid. PlanGrid has a built-in measuring tool that once scaled to a known measurement on the plan can measure distances and surface areas. This is a helpful feature when filling out details within the locus form.
________________________________________
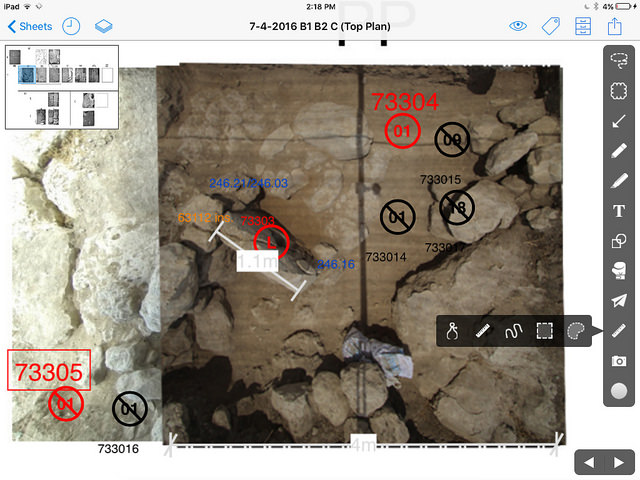
Fig 6
______________________________________
11. Sync PlanGrid to the cloud and back up your work. Upon finishing the day’s excavation and returning to the excavation camp, users should connect their device to the internet and sync their data to the cloud. Since each excavation area (or sub-area) is assigned to work on a separate part of the project and all users are signed into the same account, all of that day’s registration data will be synced to the exact location where it was placed by the area supervisor. This is also an ideal time to send the excavation director or appropriate staff member a backup of that day’s registration. There are several options for this backup including a snapshot, a PDF of the entire sheet, a PDF packet report (includes snapshot and photos taken with the camera tool), and issue packet (a PDF that includes all of the issues on the sheet). Of these, the issue packet is our preferred option.
______________________________________
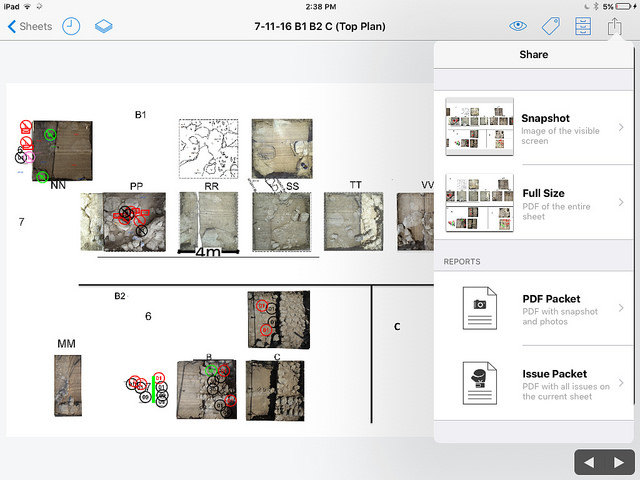
Fig 7
_______________________________________
12. Use PlanGrid for preliminary analysis. At Tel Burna, we use PlanGrid during our daily pottery analysis. Since the pottery basket has the same number on both the physical tag and in PlanGrid, we need to search for that basket number within PlanGrid. This is accomplished either by going directly to the plan from the relevant day of excavation or by selecting the “issues drawer” icon in the upper-right hand corner of the sheets gallery. Using the latter option, one would then select “issues log,” which will allow you to search the entire area for the specific basket. Once selected, the issue will be displayed with the plan in the background, which allows for the archaeologist to immediately determine the context of the pottery basket. This feature also works for other stamps (e.g., locus) and can be used to search the entire project for any word or phrase. Once we have analyzed a pottery basket, we select “closed” from within the form in order to easily distinguish baskets that we have analyzed. Likewise, loci should be “closed” through the same process. We also prefer to distinguish the accompanying locus graphic title by making the title have a box around it, which is an option when choosing the text’s font size.
______________________________________
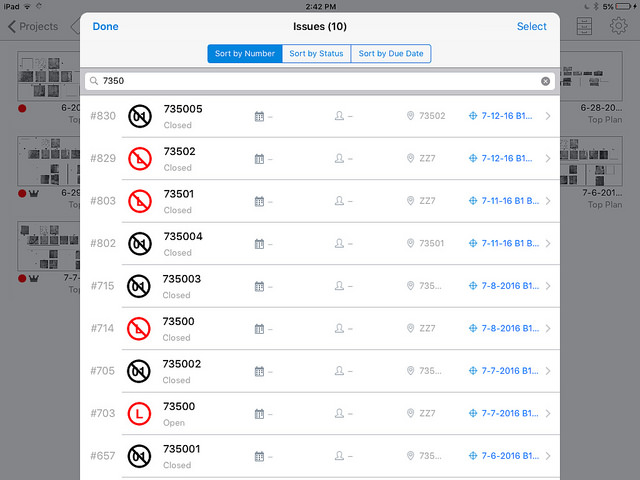
Fig 8
_____________________________________________________
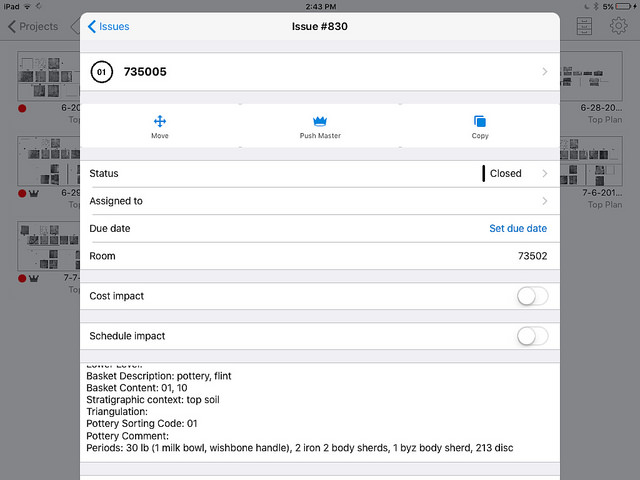
Fig 9
________________________________________
13. Prepare for the next day of excavation. Repeat steps 5-6, in order to create a top plan for the next day of excavation. Once you have created the plan for the following day, open up the current day’s plan and select all relevant annotations that should appear on the subsequent day’s plan. In order to do this, select the lasso tool at the top of the tool bar. The lasso tool allows you to select annotations by either selecting all, running your finger or stylus through annotations, or “lassoing” annotations by encircling them with a circle. Once the annotations have been selected, select “copy” and then navigate to the next day’s drawings, tap the screen and select “past in place.” This will paste the selected annotations in the same location as the previous day, assuming that your top plan is the same size. If you have changed the size of your top plan, you will need to manually move each annotation (see step 9) to its desired location. After you have copied the annotations to the next day’s plan, you should then update the relevant annotations for the next day’s work (e.g., changing levels, opening new loci, etc.)
________________________________________
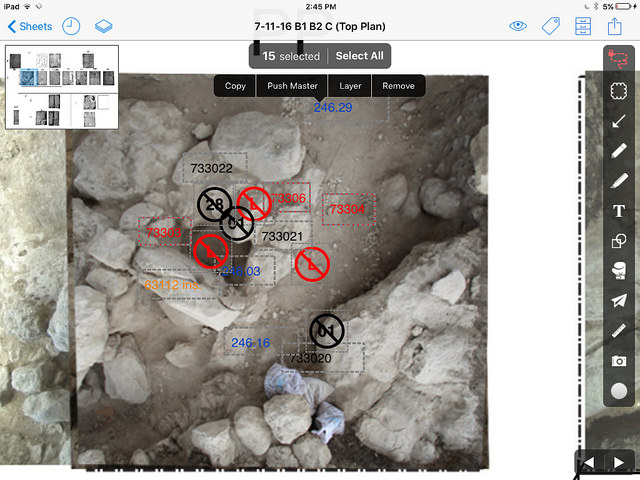
Fig 10
_________________________________________
14. Compile a report. One of the best features of PlanGrid is that it easily creates reports in CSV or PDF formats. Reports can only be created in the browser version of PlanGrid within the “issues” section of the dashboard. There are several filtering options within the “report” system (e.g., sheet, keywords, content, etc.) that allows a user to select the specific data that they need to export. In our adaptation, we use the CSV export in order to transfer the data from PlanGrid to our database system. This process is straightforward, but requires some data manipulation because the majority of our locus and basket data is within a single cell entitled “description,” which includes our fixed locus and basket templates. The exported PDF reports are very useful for sending data to specialists and creating end of season excavation reports for the archaeological governing authorities (e.g., the Israel Antiquities Authority). These reports are automatically collated and each “issue” (i.e., basket or locus) includes a small window showing the location of the issue on the top plan, all of the written data within the form, and any photos taken within the locus or basket form.
________________________________________
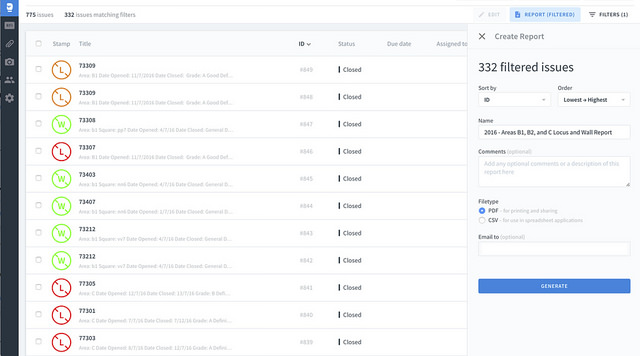
Fig 11
___________________________________________
Conclusion
Tel Burna’s adaptation of PlanGrid has been a very useful and affordable tool for our archaeological field registration. This method together with our “aerial” photos has many advantages over paper forms that allow our project to produce better and more accurate archaeological data at a faster pace than traditional methods (i.e., hand-drawn plans and hand-written forms). Over the course of four seasons (2012-2016), we have continued to refine our PlanGrid adaptation and achieved better results in each season we have used the software. Moreover, PlanGrid itself has been constantly updated and improved by its developers, which indicates that our archaeological adaptation of the system will continue to improve as new features are added to PlanGrid. One of the defining characteristics of the system is that it provides a flawless and effortless data synchronization across multiple devices. After four seasons, we have yet to lose any data despite the fact that we work in difficult field conditions and often have a poor internet connection at the excavation camp. In light of the fact that the software itself is free, PlanGrid would seem to be a particularly useful tool for a small scale excavation on a limited budget. On the other hand, it should be noted that PlanGrid is not a database, however, the data from PlanGrid can easily be exported in a CSV file for importation into an existing archaeological database.
We understand that there are many new digital archaeological recording systems (e.g., Codifi, Archfield, etc.), and we are open to the possibility of testing and implementing these types of systems at Tel Burna. Still, based on our very positive experience with PlanGrid over the last four seasons we highly recommend its use as an archaeological field registration tool.
_____________________________________________________
Bibliography
Gay, E., Cooper, D., Kimia, B., Taubin, G., Cabrini, D., Karumuri, S., Doutre, W., Liu, S., Galor, K., Sanders, D., 2010. REVEAL intermediate report, in: Proceedings of CVPR Workshop on Applications of Computer Vision in Archaeology (ACVA’10). IEEE, pp. 1–6.
McKinny, C., Shai, I., in press. Using Tools in Ways in Which They Were Not Intended: A Test Case of the Use of PlanGrid for Field Registration at Tel Burna, in: Levy, T.E., Jones, I. (Eds.), Cyber-Archaeology and Grand Narratives: Digital Technology and Deep-Time Perspectives on Culture Change in the Middle East. Springer.
Miller, R., 2015. PlanGrid Lands $40 Million Investment To Expand Product. TechCrunch.
Prins, A.B., Adams, M.J., Homsher, R.S., Ashley, M., 2014. Digital Archaeological Fieldwork and the Jezreel Valley Regional Project, Israel. East. Archaeol. 77, 192–197. doi:10.5615/neareastarch.77.3.0192
Shai, I., Ben-Shlomo, D., Cassuto, D., Uziel, J., 2015a. Tel Burna in Iron Age II: A Fortified City on Judah’s Western Border. Judah Samaria Res. Stud. 24, 27–34.
Shai, I., Cassuto, D., Dagan, A., Uziel, J., 2012. The Fortifications at Tel Burna: Date, Function and Meaning. Isr. Explor. J. 62, 141–157.
Shai, I., Dagan, A., Riehl, S., Orendi, A., Uziel, J., Suriano, M., 2014. A Private Stamped Seal Handle from Tel Burna, Israel. Z. Dtsch. Paläst.-Ver. 130, 121–137.
Shai, I., McKinny, C., Uziel, J., 2015b. Late Bronze Age Cultic Activity in Ancient Canaan: A View from Tel Burna. Bull. Am. Sch. Orient. Res. 115–133.
Shai, I., Uziel, J., 2014. Addressing Survey Methodology in the Southern Levant: Applying Different Methods for the Survey of Tel Burna, Israel. Isr. Explor. J. 64, 172–190.
Sharp, C., McKinny, C., Shai, I., 2015. Late Bronze Age Figurines from Tel Burna. Strata Bull. Anglo-Isr. Archaeol. Soc. 33, 61–76.
Smith, N.G., Levy, T.E., 2014. ArchField in Jordan: Real-Time GIS Data Recording for Archaeological Excavations. East. Archaeol. 77, 166–170. doi:10.5615/neareastarch.77.3.0166
Uziel, J., Shai, I., 2010. The Settlement History of Tel Burna: Results of the Surface Survey. Tel Aviv 37, 227–245.
__________________________________________________
Receive 30 days free access to the popular new CuriosityStream lineup of documentaries on science, history, nature, and technology as a new Popular Archaeology premium subscriber.
___________________________________________
Travel and learn with Far Horizons.

____________________________________________